

The default setup
When we install we will get a default setup. The Property editor can be set up individually for all file types in Inventor. We also separate sheet metal and modeling.
The property editor can be docked or float free just like Inventors own menu's.
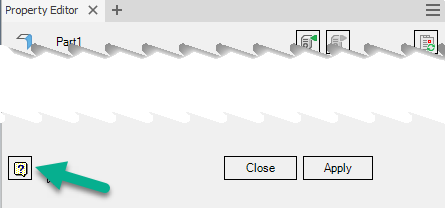
Please remember that you can always use the Help menu from inside Sovelia Inventor menus.
Short Introduction Video
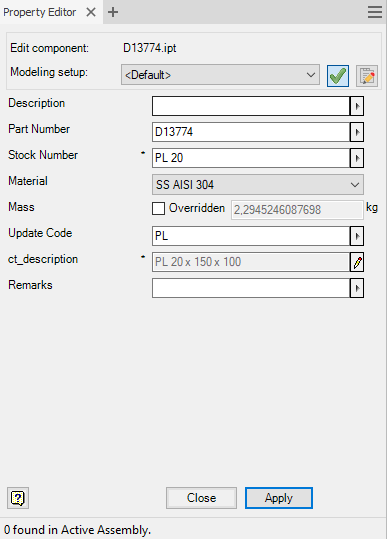
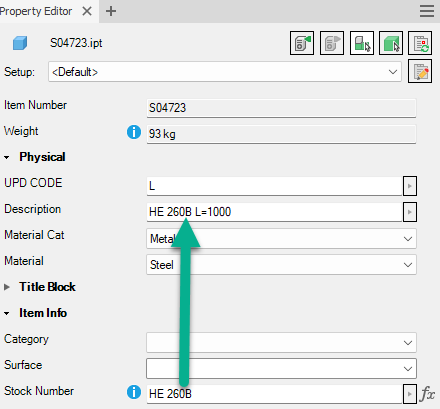
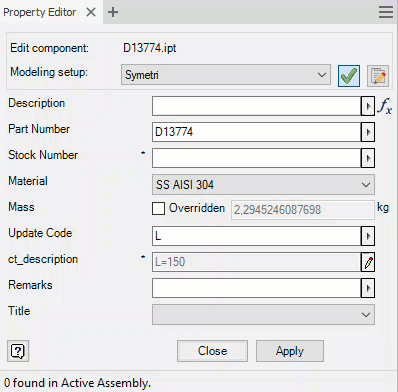
Part
Note: The Update Code is where we tell Cadit about our self modelled parts so it can be measured/calculated propertly.
If we use content center or Sovelia Components it will be automatic measured. When we measure we can set up where the result of the Update Code get written.
Pr default it is written to ct_description. Also note that we use Stock Number for some measurement prefixes. This is according to how the Content Center databases are mostly set up. It can be reconfigured.
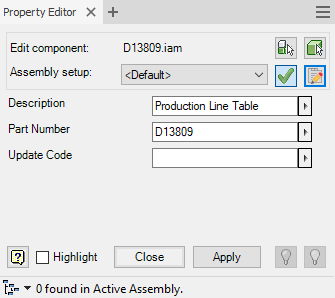
Assembly
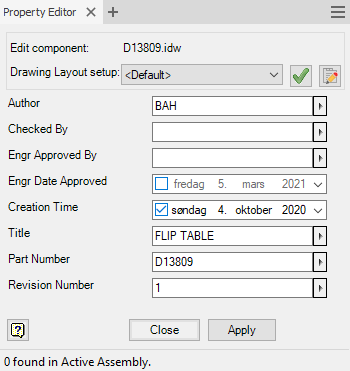
Drawing
Use the Property Editor
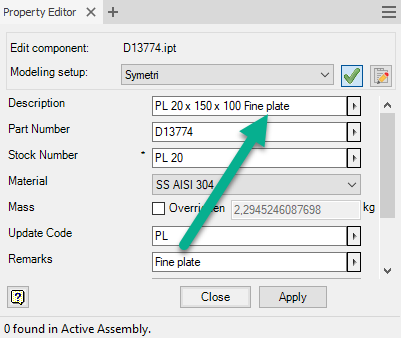
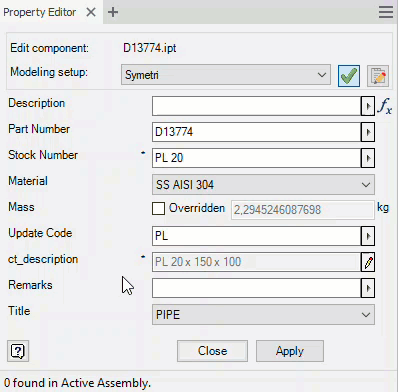
When we set the update code we can select from lists or just type in the input fields
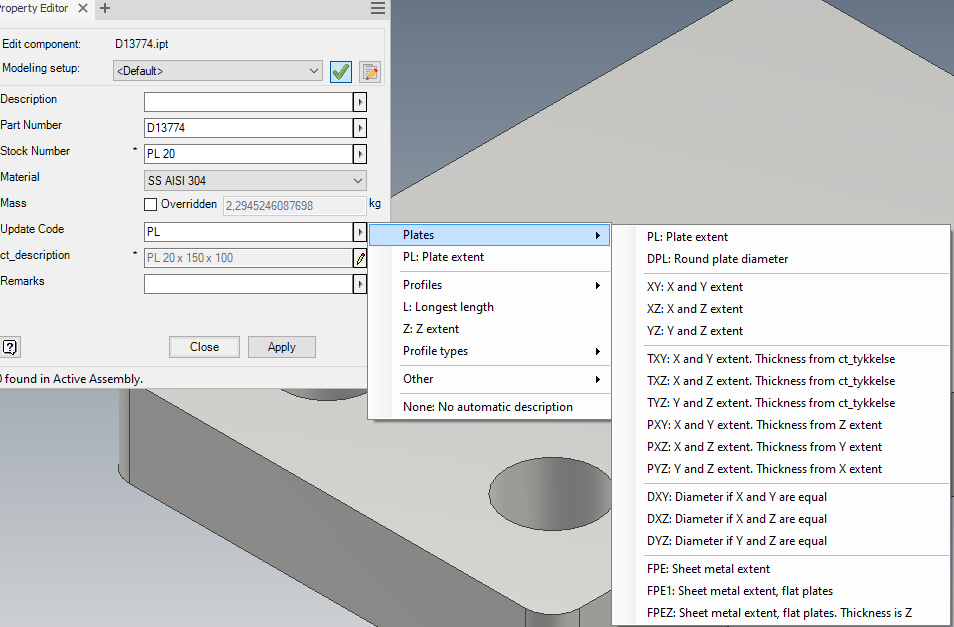
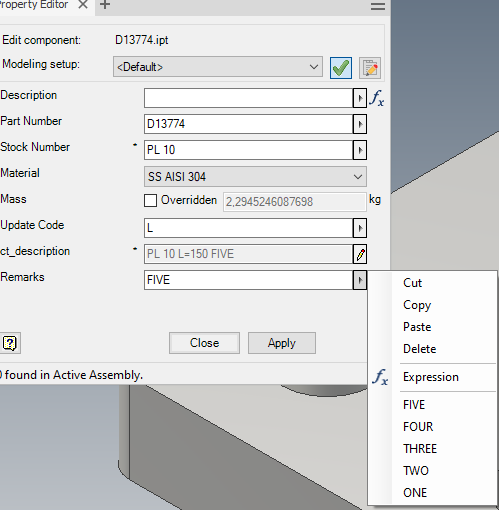
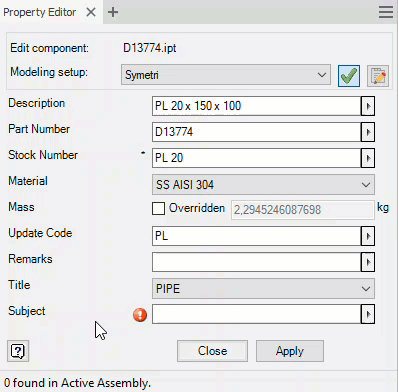
When we set the update code we can also add information with the calculation
Here we use remarks to add information behind the plate calculation
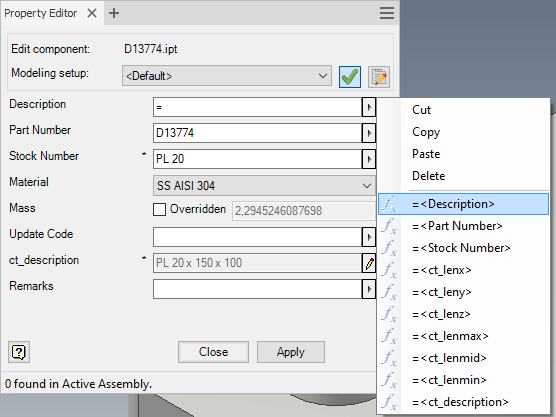
We can build strings by Right Mouse Click in the field and select expressions
We can also build strings by Right Mouse Click in the field and select expressions
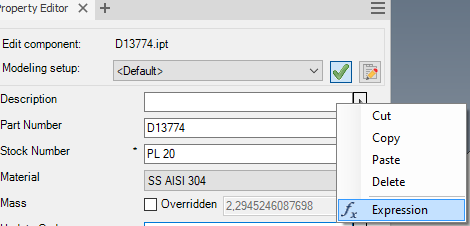
Then we can build strings from pre defined values.
This can be configured. See "Create Expression List" chapter
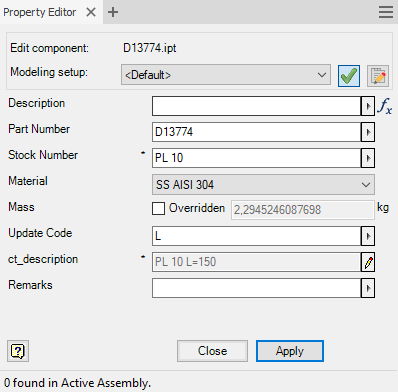
Pr default the Stock Number are used to create prefix and if Stock number have a value it will be written in front of the measurement.
This can be configured in "Stock Number Remove" chapter
The property editor remember last typed values in a list.
This can be configured in the CaditInventor.ini
MaxHistoryItems=10
To add properties into the model you can press "Apply" or press "Enter"
Select and Create Properties
To set up the property editor we use the configurator to select or create properties
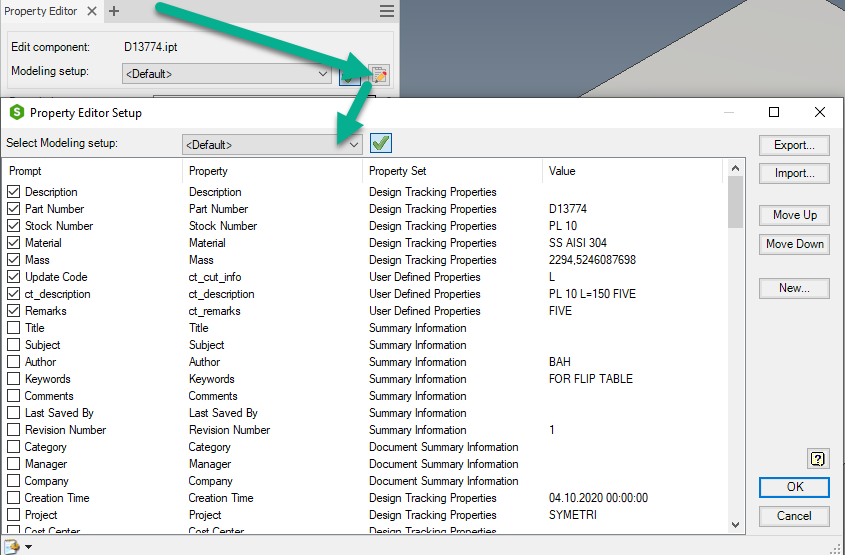
We can create properties, or headings by selecting new and then move them into position. To see more; use the Help symbol.
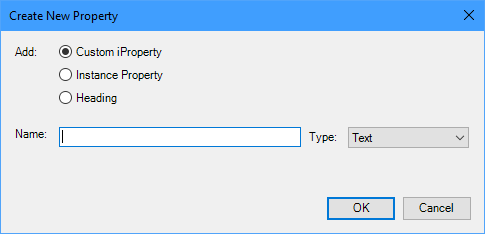
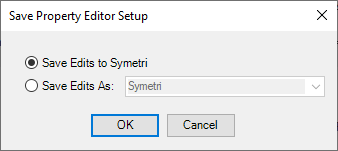
Selecting OK prompts us to save as new, or modify the existing. The setup will be saved into the common folder\Property Editor to be available for all.

We can also type Aliases for the properties
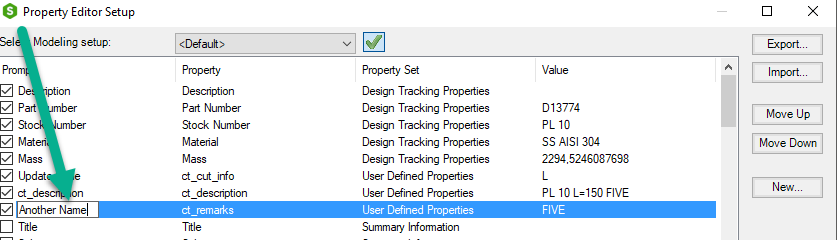
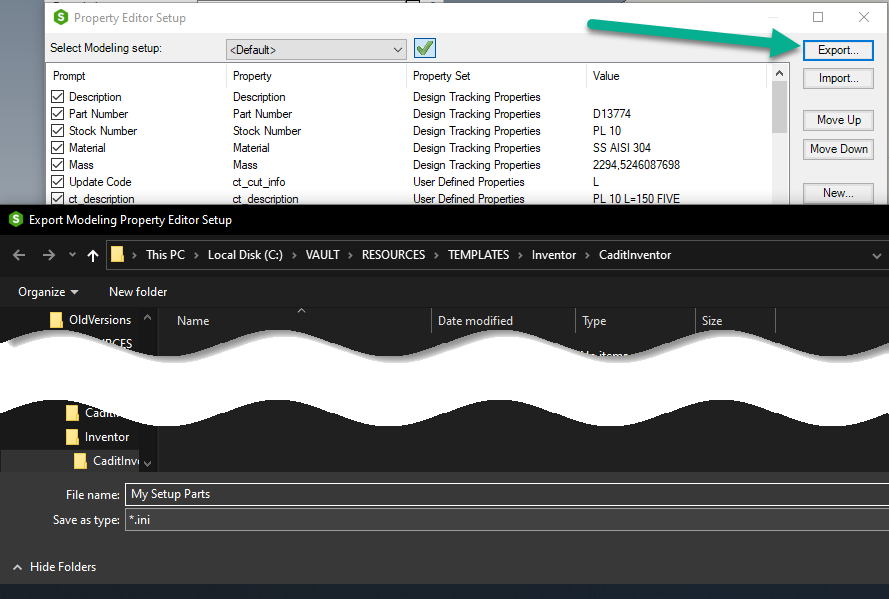
And export and import setups
Create Read Only Properties
If you have not already done it, copy the "Cadit Property Editor.ini" file from local folder/Settings to Common folder/Settings

Global Read Only
This will make the property read only in all modes. Part, assembly and drawing.
[Property Modes]
; property name = source, disabled or listonly.
; MRU.Property Editor.property name = name of ini file section defining context menu
YourProperty = disabled
Mode Spesific Read Only
This will make the property read only in the selected Mode. Part, assembly or drawing.
[Property Modes Modeling] (Parts)
; property name = source, disabled or listonly.
; MRU.Property Editor.property name = name of ini file section defining context menu
YourProperty = disabled
[Property Modes Assembly] (Assemblies)
; property name = source, disabled or listonly.
; MRU.Property Editor.property name = name of ini file section defining context menu
YourProperty = disabled
[Property Modes Drawing Layout] (Drawings)
; property name = source, disabled or listonly.
; MRU.Property Editor.property name = name of ini file section defining context menu
YourProperty = disabled
To decide where the Update code are written
If you have not already done it, copy the "Cadit Update.ini" file from local folder/Settings to Common folder/Settings
- Open the "Cadit Update.ini" file from Common folder/Settings
- Go to the section "[ResultPropertyName]"
- Change the property
Standard Setup:
[ResultPropertyName]
PartDescription = ct_description
;PartDescription1 = Design Tracking Properties.Part Number
;PartDescription2 = Design Tracking Properties.Description
If I for example want to use Description:
[ResultPropertyName]
;PartDescription = ct_description
;PartDescription1 = Design Tracking Properties.Part Number
PartDescription = Design Tracking Properties.Description****
If you don't want to write to Stock Number
If you have not already done it, copy the "Cadit Update.ini" file from local folder/Settings to Common folder/Settings
- Open the "Cadit Update.ini" file from Common folder/Settings
- Remove the Stockdescription by placing a semicolon in front of the line “stockdescription” if you don’t want to set a stock number value
[ResultPropertyName]
;StockDescription = Design Tracking Properties.Stock Number
You can set any other property for this value.
[ResultPropertyName]
StockDescription = Design Tracking Properties.My Property
Create Dropdown lists
If you have not already done it, copy the "Cadit Property Editor.ini" file from local folder/Settings to Common folder/Settings
- Create a property or decide on what property should have a list. (We will use Title in this example)
- Set up if the property will be list only, or if you want to also type free text.
- To set list Only, open the "Cadit Property Editor.ini" file from Common Folder/Settings.
- Go to Section "[Property Modes]" and set Listonly if you want to only select from the list. If you do nothing you can also type free text.
If we select Title to be list only it will look like this
[Property Modes]
Title =Listonly
- Next is to create the dropdown list. Create a txt file and place it into the "Common Folder/Property editor" folder. You can call it whatever you want. I use to name it same as the property.

- Now we need to tell the property where to find the list.
Go to Section "[Property DropDownFile]" in the "Cadit Property Editor.ini" and add your Information.
Selecting our list will look like this
[Property DropDownFile]
Title =Title.txt
- Save the "Cadit Property Editor.ini" file and check your Sovelia Inventor
Add Tooltip
If you have not already done it, copy the "Cadit Property Editor.ini" file from local folder/Settings to Common folder/Settings
- Open the ""Cadit Property Editor.ini"" file from Common folder/Settings
- Go to the section "[Property StarToolTip]"
- Add your tooltip
[Property StarToolTip]
property name = tooltip text
A star will appear on the property and the text will show when you hover the mouse over it
How to set text Settings
If you have not already done it, copy the "Cadit Property Editor.ini" file from local folder/Settings to Common folder/Settings
- Open the ""Cadit Property Editor.ini"" file from Common folder/Settings
- Go to the section you want to set
- Add your settings
Some Examples using property "Subject"
[Property MinLength]
; property name = min number of characters for property value
Subject = 1
[Property MaxLength]
; property name = max number of characters for property value
Subject = 8
[Property TextCase]
; property name = lower or upper
Subject = Upper
- Save the "Cadit Property Editor.ini" file and check your settings. (You have to open and close the property editor to see the changes)
Anything you type will be uppercase and you cant type more than 8 letters and spaces.
Link old Properties
To take care of and update old properties
If you have not already done it, copy the "Cadit Update.ini" file from local folder/Settings to Common folder/Settings
- Open the "Cadit Update.ini" file from Common folder/Settings
- Go to the section "[ResultPropertyName]"
- Set up what property will be updated. Below you can see that the Sovelia Inventor property ct_lenx will update .CQTools_X and/or Naviate_Range_X.
[ResultPropertyName]
ct_lenx = Custom Properties.ct_lenx
;ct_lenx1 = Custom Properties.CQTools_X
;ct_lenx2 = Custom Properties.Naviate_Range_X
ct_leny = Custom Properties.ct_leny
;ct_leny1 = Custom Properties.CQTools_Y
;ct_leny2 = Custom Properties.Naviate_Range_Y
ct_lenz = Custom Properties.ct_lenz
;ct_lenz1 = Custom Properties.CQTools_Z
;ct_lenz2 = Custom Properties.Naviate_Range_Z
ct_lenmax = Custom Properties.ct_lenmax
ct_lenmid = Custom Properties.ct_lenmid
ct_lenmin = Custom Properties.ct_lenmin
Update Properties
Sovelia Inventor can copy properties between files and also internally in files.
If you have not already done it, copy the "Cadit Inventor.ini" file from local folder/Settings to Common folder/Settings
- Open the "CaditInventor.ini" file from Common folder/Settings
- Add your settings in
[UpdateProperties] (This is to update the Cadit Update.ini on save)
AutoUpdate=1
[UpdateDrawing] (This is to update the drawing on save)
AutoUpdate=1
ItemNo = 1
;ScaleProperties = 0
CopyModelProperties = 1
Expression List
The Expressions are stored in the "Cadit Property Editor.ini".
If you have not already done it, copy the "Cadit property Editor.ini" file from local folder/Settings to Common folder/Settings
- Open the "Cadit Property Editor.ini" file from Common folder/Settings
- Go to the [Standard Expression List] and add or edit your settings
[Standard Expression List]
; Expression# = expression to show in context menu
Expression1 = =
Expression2 = =
Expression3 = =
Expression4 = =<ct_lenx>
Expression5 = =<ct_leny>
Expression6 = =<ct_lenz>
Expression7 = =<ct_lenmax>
Expression8 = =<ct_lenmid>
Expression9 = =<ct_lenmin>
Expression10 = =<ct_lenmin> x <ct_lenmid> x <ct_lenmax>
Linked Excel Lists
If you have not already done it, copy the "Cadit Property Editor.ini" and the "Cadit Inventor.ini" file from local folder/Settings to Common folder/Settings
How to create linked properties based on an excel sheet.
- Place the Excel sheet in the Common folder/Property Editor ;

-
In the "Common folder/Settings/Cadit Inventor.ini" file, go to the "DropDownListSetup]" Section.
[DropDownListSetup]
ExcelFile = Category.xlsx (Name of Excel file in the "Common folder/Property Editor" folder)
ExcelSheetName = Sheet1 (Name of sheet with data)
ExcelStartCell = A2 (Where Sovelia Inventor will look for the first value)
ExcelNoOfColumns = 4 (Number of properties read. One property pr column) -
In the "Common folder/Settings/Cadit Property Editor.ini" file, go to the "[Property Modes]" Section to set as a global property list only. (If you want to set for only some property modes, go to [Property Modes Modeling], [Property Modes Assembly] or [Property Modes Drawing] and add as below.
Note that the properties have to be named as the headings form the Excel sheet.
[Property Modes]
Category_1 = listonly
Category_2 = listonly
Category_3 = listonly
Category_4 = listonly
Or like this if you only want to use on parts only
[Property Modes Modeling]
Category_1 = listonly
Category_2 = listonly
Category_3 = listonly
Category_4 = listonly
-
Under the "[Property MinLength]" section we can set a minimum length. Text Settings
[Property MinLength]
Category_1 = 1
Category_2 = 1
Category_3 = 1
Category_4 = 1 -
Under the "[Property DropDownFile]" section, add information to describe how he Excel should be read. To speed up the read process we create temporary text files in the users App data folder. (C:\Users%Username%\AppData\Local\Symetri\Sovelia Inventor 2021 Addin\Property Editor Cache\Category.xlsx_Sheet1_A2)
[Property DropDownFile]
Category_1 = %ExcelFile%\Column_1.txt
Category_2 = %ExcelFile%\Column_2_(pp:Category_1).txt
Category_3 = %ExcelFile%\Column_3_(pp:Category_1)(pp:Category_2).txt
Category_4 = %ExcelFile%\Column_4(pp:Category_1)(pp:Category_2)(pp:Category_3).txt
How to create a system default Setup
If you have not already done it, copy the "Cadit Propert Editor.ini" file from local folder/Settings to Common folder/Settings
When you are creating a setup and save it you create a setup .ini file in the "Common/Property Editor" folder.
The data from this file can be copied into the "Cadit Property Editor.ini" file.
In our example the ini file will be called "Symetri.ini"
Cadit Property Editor.ini - Parts
[Properties Modeling]
; Settings for property editor setup "
;AllowSetup=0 (We can restrict the users from editing the editor)
Paste your setup here from the setup ini file [Properties Modeling]
Cadit Property Editor.ini - Assemblies
[Properties Assembly]
; Settings for property editor setup "
;AllowSetup=0 (We can restrict the users from editing the editor)
Paste your setup here from the setup ini file [Properties Assembly]
Cadit Property Editor.ini - Drawing
[Properties Drawing]
; Settings for property editor setup "
;AllowSetup=0 (We can restrict the users from editing the editor)
Paste your setup here from the setup ini file [Properties Drawing]
Start Property editor at Inventor startup
If you have not already done it, copy the "CaditInventor.ini" file from local folder/Settings to Common folder/Settings
** Open the "CaditInventor.ini" file from Common folder/Settings**
- Go to the section "[Startup]"
- Set up OperPropertyEditorOnStartup to 1
Example
[Startup]
OpenPropertyEditorOnStartup=1
Change Profile Types List
If you have not already done it, copy the "Cadit Property Editor.ini" and the "Cadit Update.ini" file from local folder/Settings to Common folder/Settings
**This is the menu topics in the property editor. We can edit those values in the Cadit Property Editor.ini in the common folder. **
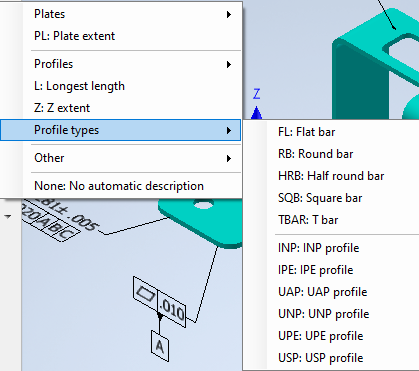
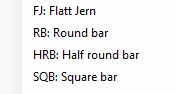
*** Lets change Flat Bar to Flatt Jern.**
[Cadit Cut Info Description list Menu4] ; profile types
FL = Flat bar (FJ = Flatt Jern)
RB = Round bar
HRB = Half round bar
SQB = Square bar
TBAR = T bar
-- = --
INP = INP profile
IPE = IPE profile
UAP = UAP profile
UNP = UNP profile
UPE = UPE profile
USP = USP profile
This gives this result in the menu
*** The next we have to do is setting the update code in the cadit update.ini**
- First the Measuring Method reference
[MeasuringMethods]
Method2=PL|DPL|PLATE|DPLATE|FJ|FJPEL|SQB|TBAR|INP|IPE|UAP|UNP|UPE|USP|H
Method3=L|RB|HRB
- Then the Update Code string (TIP : Search for the FL and change it in the Update Rule to FJ)
[UpdateRule1.17] ; FJ for flatt Jern (replaces FPEL /FL))
IfProperty = ct_cut_info
IfValue = FJ
SetProperty = ResultPropertyName(PartDescription)
SetValue = FJ (ExtW,0:)x(ExtTZ,0:) L=(ExtL,0:) (pp:ct_remarks)
SetProperty1= Design Tracking Properties.Stock Number
SetValue1 = FJ (ExtW,0:)x(ExtTZ,0:)
SetProperty2= ResultPropertyName(CutLength)
SetValue2 = (ExtL,0:)
SetProperty3= ResultPropertyName(ExternalDimensions)
SetValue3 = (ExtL,0:)
Type3 = Text
SetProperty4= ResultPropertyName(CutWidth)
SetValue4 =
Type4 = Text
SetProperty5= ResultPropertyName(ct_qty)
SetValue5 = (ExtL,0:) mm
SetProperty6= ResultPropertyName(ct_qtyunit)
SetValue6 = mm
UpdateIAM = 0
UpdateIPT = 1
Goto = exit
**This gives this result: **

To calculate weight
If you have not already done it, copy the "Cadit Update.ini" file from local folder/Settings to Common folder/Settings
- Open the "Cadit Update.ini" file from Common folder/Settings
- Search for ct_weight
- Set up ct_weight to be active by setting values to 1
- ct_weight is now a custom property that will give the weight with the correct measure.
[UpdateRule11]
Description = Set custom Weight, Density and COG properties
Comments = Set values from physical properties to custom properties.
DefaultChecked = 1
InUse = 1
Mandatory = 1
[UpdateRule11.1]
IfProperty =
IfValue =
SetProperty = ResultPropertyName(ct_weight)
SetValue = (weight:) kg
UpdateIAM = 1
UpdateIPT = 1
To set drawing scale based on view
If you have not already done it, copy the "Cadit Update.ini" file from local folder/Settings to Common folder/Settings
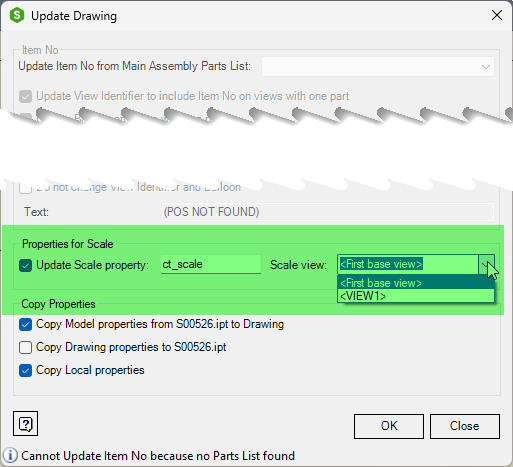
The default settings is that the first base view will be the target to collect the scale, but the other views can be selected from the Update drawing menu.
In addition to the main scale property there will be made one property for each sheet with the sheet number added to the name and with the value from the first view on each sheets.
If the property name is ct_scale and the drawing has tree sheets there will be four scale properties: ct-scale, ct_scale1, ct-scale2 and ct_scale*
#### In order to change the settings for all users we need to edit the settings inside the "Cadit Update Drawing.ini" file.
- Open the "Cadit Update Drawing.ini" file from Common folder/Settings
- Set the scale to update automatically with your scale property name in the drawing.
[Options]
UpdateScaleProperty=1 (Updates the scale property on save)
ScalePropertyName=ct_scale (You can set the property name)
After this is set you should see your scale property name in the menu. If not, find the properties in your Caditmru.ini file and delete them.
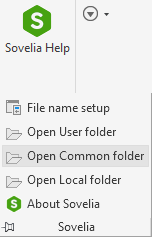
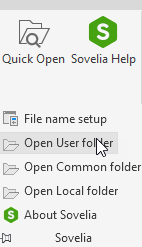
To find the Caditmru.ini file, use the Sovelia Inventor menu and select "Open User folder"
(C:\Users%username%\AppData\Local\Symetri\Sovelia Inventor 20XX Addin\Caditmru.ini file)
Then delete the scale property lines. They will be recreated from the common configuration settings
UpdateScaleProperty=1
ScalePropertyName=ct_scale
The Update Properties Menu
When Updating components there are some measurements that dont need any interaction if your Inventor is set up properly.
Any known component to Inventor such as sheet metal, from content center etc can be measure automatically and kept updated.
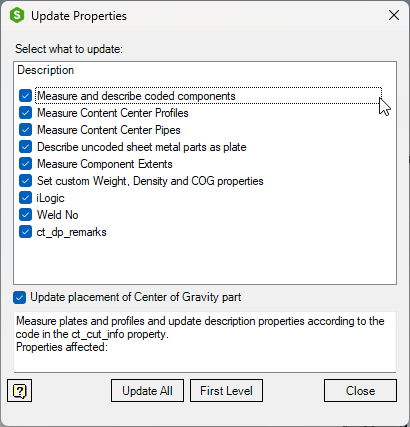
If this selections should be mandatory and not available to change for users it can be set up in the ini files.
Example: Sheet Metal in "CaditUpdate.INI"
- Default checked means that its checked when installed.
- In Use means that the function is active
- Mandatory means that it can't be unchecked by user.

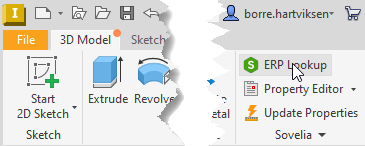
Sovelia Inventor (ERP) Lookup
Sovelia Inventor (ERP) lookup is not installed as a part of the standard installation before version "SoveliaInventor2024 (x64L) 24.0.437" but need to be separately installed
Sovelia Inventor (ERP) lookup is integrated in the Inventor panels, and as automatically activated for supported file types (e.g. ipt, iam, ipn).
CSV or SQL lookup
Sovelia Inventor (ERP) lookup can read item data from CSV-files or a SQL lookup table or view on a database server. The available Inventor properties along with the available properties in the CSV-files or the SQL table/view is listed, and presented in a GUI to easily configure the property mapping. The first row is considered the primary key, typically the part number. The numbers of rows and row names are fully dynamic.
The lookup supports multiple configurations from version 25.0.452
NB: Use ";" or TAB as separator in csv files.
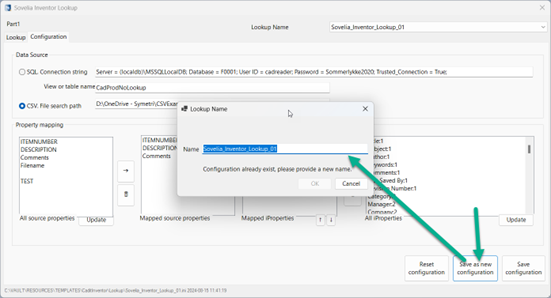
Configuration
Sovelia Inventor (ERP) lookup has a password protected configuration page. The configuration is stored in the common templates folder, and as such is distributed and loaded on all other users’ workstation on startup if distributed. This makes it easy to share and maintain a common configuration for the ERP lookup for all users. Standard Password for configuration is "!".
The configuration files are stored in the "Common folder\Lookup"
Properties such as part material or boolean values are not 100% supported in versions before 25.0.* To use this fuctionality please install the latest versions.
To se what version you are using : Go to Help
Create configurations by the different settings in the configuration window.
- Single Csv files in a folder can be read by using "foldername\Filename.csv"
- Multiple Csv files in a folder can be read by using "foldername*csv"
- SQL can be set up by stanard sql connection string

- "Save as new configuration" prompts you for a new name. You can then change the configuration and then "save configuration" to save your changes.
Installation instructions pre "SoveliaInventor2024 (x64L) 24.0.437"
Request the files from Sovelia.Com
-
Add the two files:
Sovelia_Inventor_ERP_Lookup 2.0.2.0\Sovelia_Inventor_ERP_Lookup.dll
Autodesk.Sovelia Inventor ERP Lookup.Inventor.addin -
into :
%appdata%\Autodesk\ApplicationPlugins\Sovelia_Inventor_ERP_Lookup -
Start Inventor and unblock the add in.
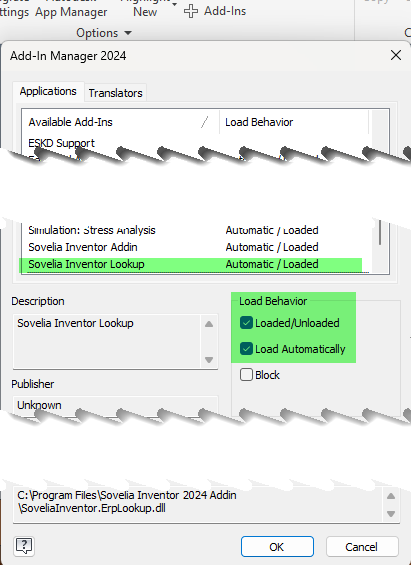
Installation instructions post "SoveliaInventor2024 (x64L) 24.0.437"
The add in is installed with the software but need to be loaded in Inventor.
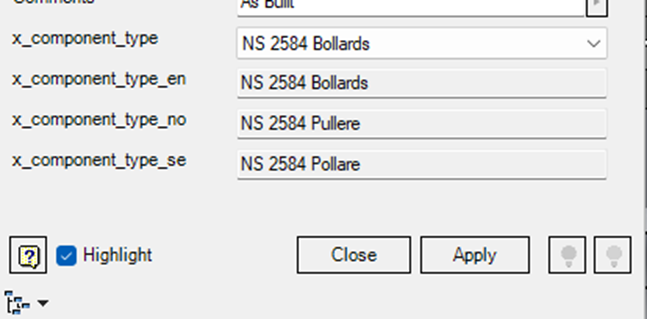
Secondary Properties
This can be used as a translator or just a way to import static data. This example shows a translation where we select the name and get translated from a list to Norwegian, English and Swedish.
If you have not already done it, copy the "Cadit Property editor.ini" file from local folder/Settings to Common folder/Settings
To set this up you need to edit the Common folder file "Cadit Property editor.ini" below the [Property DropDownFile]
The example is set up like this:
[Property DropDownFile]
*xcomponenttype = Multiple properties example.txt
; 0 = No, number of heading lines, 1=one heading line
xcomponenttype ColumnHeaders =1
; What is separating the columns. For tab as separator use
xcomponenttype Separator =;
;xcomponenttype Separator =" - "
; What should be displayed (example: <1> is the value in column 1 in the file)
xcomponenttype Display =<1> <2>
; What should be saved in the property (example: <1> is the value in column 1 in the file)
xcomponenttype Value =<1> <2>
; What tooltip is displayed when hovering the dropdown menu (example: <1> is the value in column 1 in the file)
xcomponenttype Tooltip =<1> - <2> / <3> / <4>
xcomponenttype Property1 = xcomponenttypeen
xcomponenttype Value1 = <1> <2>
xcomponenttype Property2 = xcomponenttypeno
xcomponenttype Value2 = <1> <3>
xcomponenttype Property3 = xcomponenttypese
xcomponent_type Value3 = <1> <4>*
The "Multiple properties example.txt" placed in the common folder Property Editor folder look like this:
Code;English;Norsk;Svensk
NS 2521;Handles of steel;Håndtak av stål;Handtag av stål
NS 2584;Bollards;Pullere;Pollare
NS 2619;Half link fastening;Bøyler;Halv länkfäste
NS 2620;Lifting lug;Øyeplater;Lyftögla
NS 2639;Weld studs M20;Sveiseskruer M20;Svetsbultar M20
NS 2692;Handle screw nut M20;Vingemutter M20;Vingmutter M20
NS 6252;Welded container sockets with one hole, flush fitted;Sveiste containerfester med ett hull, plant montert;Svetsade containerfästen med ett hål, planmonterade
NS 6253;Welded container sockets with two holes longitudinally or transversely, flush fitted;Sveiste containerfester med to hull langskips eller tverrskips, plant montert;Svetsade containerfästen med två hål i längd- eller tvärriktningen, planmonterade
NS 6254;Welded container sockets with four holes, flush fitted;Sveiste containerfester med fire hull, plant montert;Svetsade containerfästen med fyra hål, planmonterade
NS 6258;Welded lashing socket for elephantfeet, flush fitted;Sveist surringsfeste for elefantføtter, plant montert;Svetsad surrningsfäste för elefantfötter, planmonterade
NS 6275;Weld studs with reduced base;Sveiseskruer med redusert stamme;Svetsbultar med reduserad bas
NS ISO 8146;Oval eyeplates;Øyeplater, ovale;Ovala ögonbrickor
Your Ini file will look like this after you set it up in the property editor
For this example we have saved the setup as "MultipleProperties"
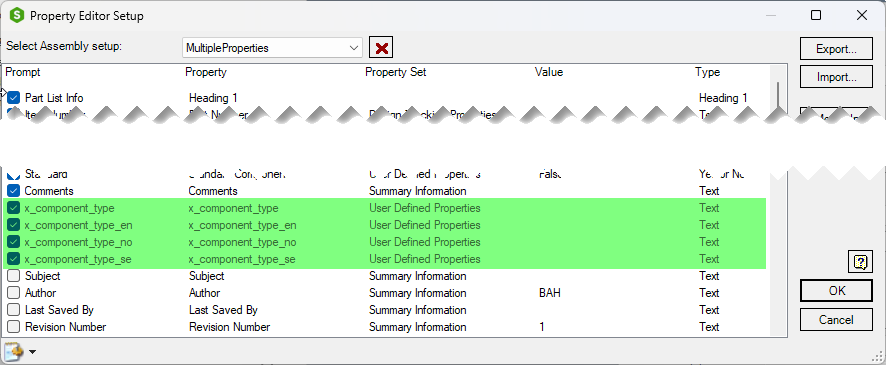
You dont need to create a setup for each filetype in the property editor, but can copy paste and change name in the brackets. If you create the setup in Assemly you can copy the setup and rename the brackets in the ini file.
[Properties Assembly]
[Properties Modeling]
[Properties Sheet Metal]
The example file is named "Multiple Properties", stored in the "CaditInventor/Property editor folder" and contains the setup we created for assembly. We have copied the setup two times and renamed the brackets text.
[Properties Assembly]
PropertySet0=
Property0=Part List Info 20210201034914323
Prompt0=Part List Info
Type0=Heading 1
PropertySet1=Design Tracking Properties
Property1=Part Number
Prompt1=Item Number
Type1=Text
PropertySet2=User Defined Properties
Property2=ct_cut_info
Prompt2=UPD CODE
Type2=Text
PropertySet3=Design Tracking Properties
Property3=Description
Prompt3=Description
Type3=Text
PropertySet4=
Property4=Drawing Title Block Info 20191123074605042
Prompt4=Title Block
Type4=Heading 1
PropertySet5=Summary Information
Property5=Title
Prompt5=Title L1
Type5=Text
PropertySet6=Design Tracking Properties
Property6=Project
Prompt6=Project L2
Type6=Text
PropertySet7=Summary Information
Property7=Keywords
Prompt7=Keywords L3
Type7=Text
PropertySet8=
Property8=Adittional Item Info 20191123074657155
Prompt8=Item Info
Type8=Heading 1
PropertySet9=User Defined Properties
Property9=Cat
Prompt9=Category
Type9=Text
PropertySet10=User Defined Properties
Property10=Surface
Prompt10=Surface
Type10=Text
PropertySet11=User Defined Properties
Property11=Purchased Component
Prompt11=Purchased
Type11=Yes or No
PropertySet12=User Defined Properties
Property12=Standard Component
Prompt12=Standard
Type12=Yes or No
PropertySet13=Summary Information
Property13=Comments
Prompt13=Comments
Type13=Text
PropertySet14=User Defined Properties
Property14=x_component_type
Prompt14=x_component_type
Type14=Text
PropertySet15=User Defined Properties
Property15=x_component_type_en
Prompt15=x_component_type_en
Type15=Text
PropertySet16=User Defined Properties
Property16=x_component_type_no
Prompt16=x_component_type_no
Type16=Text
PropertySet17=User Defined Properties
Property17=x_component_type_se
Prompt17=x_component_type_se
Type17=Text
[Properties Modeling]
PropertySet0=
Property0=Part List Info 20210201034914323
Prompt0=Part List Info
Type0=Heading 1
PropertySet1=Design Tracking Properties
Property1=Part Number
Prompt1=Item Number
Type1=Text
PropertySet2=User Defined Properties
Property2=ct_cut_info
Prompt2=UPD CODE
Type2=Text
PropertySet3=Design Tracking Properties
Property3=Description
Prompt3=Description
Type3=Text
PropertySet4=
Property4=Drawing Title Block Info 20191123074605042
Prompt4=Title Block
Type4=Heading 1
PropertySet5=Summary Information
Property5=Title
Prompt5=Title L1
Type5=Text
PropertySet6=Design Tracking Properties
Property6=Project
Prompt6=Project L2
Type6=Text
PropertySet7=Summary Information
Property7=Keywords
Prompt7=Keywords L3
Type7=Text
PropertySet8=
Property8=Adittional Item Info 20191123074657155
Prompt8=Item Info
Type8=Heading 1
PropertySet9=User Defined Properties
Property9=Cat
Prompt9=Category
Type9=Text
PropertySet10=User Defined Properties
Property10=Surface
Prompt10=Surface
Type10=Text
PropertySet11=User Defined Properties
Property11=Purchased Component
Prompt11=Purchased
Type11=Yes or No
PropertySet12=User Defined Properties
Property12=Standard Component
Prompt12=Standard
Type12=Yes or No
PropertySet13=Summary Information
Property13=Comments
Prompt13=Comments
Type13=Text
PropertySet14=User Defined Properties
Property14=x_component_type
Prompt14=x_component_type
Type14=Text
PropertySet15=User Defined Properties
Property15=x_component_type_en
Prompt15=x_component_type_en
Type15=Text
PropertySet16=User Defined Properties
Property16=x_component_type_no
Prompt16=x_component_type_no
Type16=Text
PropertySet17=User Defined Properties
Property17=x_component_type_se
Prompt17=x_component_type_se
Type17=Text
[Properties Sheet Metal]
PropertySet0=
Property0=Part List Info 20210201034914323
Prompt0=Part List Info
Type0=Heading 1
PropertySet1=Design Tracking Properties
Property1=Part Number
Prompt1=Item Number
Type1=Text
PropertySet2=User Defined Properties
Property2=ct_cut_info
Prompt2=UPD CODE
Type2=Text
PropertySet3=Design Tracking Properties
Property3=Description
Prompt3=Description
Type3=Text
PropertySet4=
Property4=Drawing Title Block Info 20191123074605042
Prompt4=Title Block
Type4=Heading 1
PropertySet5=Summary Information
Property5=Title
Prompt5=Title L1
Type5=Text
PropertySet6=Design Tracking Properties
Property6=Project
Prompt6=Project L2
Type6=Text
PropertySet7=Summary Information
Property7=Keywords
Prompt7=Keywords L3
Type7=Text
PropertySet8=
Property8=Adittional Item Info 20191123074657155
Prompt8=Item Info
Type8=Heading 1
PropertySet9=User Defined Properties
Property9=Cat
Prompt9=Category
Type9=Text
PropertySet10=User Defined Properties
Property10=Surface
Prompt10=Surface
Type10=Text
PropertySet11=User Defined Properties
Property11=Purchased Component
Prompt11=Purchased
Type11=Yes or No
PropertySet12=User Defined Properties
Property12=Standard Component
Prompt12=Standard
Type12=Yes or No
PropertySet13=Summary Information
Property13=Comments
Prompt13=Comments
Type13=Text
PropertySet14=User Defined Properties
Property14=x_component_type
Prompt14=x_component_type
Type14=Text
PropertySet15=User Defined Properties
Property15=x_component_type_en
Prompt15=x_component_type_en
Type15=Text
PropertySet16=User Defined Properties
Property16=x_component_type_no
Prompt16=x_component_type_no
Type16=Text
PropertySet17=User Defined Properties
Property17=x_component_type_se
Prompt17=x_component_type_se
Type17=Text
Copy properties
We can copy properties inside a file or between files.
- From file to drawing
- From drawing to file
- Inside a file
The Automate menu is inside the CaditInventor.ini file to set on save.
[UpdateDrawing]
;AutoUpdate=1
;ItemNo = 0
;SynchronizePartsOnlyItemNo = 0
;SaveItemOverridesToBom = 0
;ScaleProperties = 0
;CopyModelProperties = 0
;CopyDrawingProperties = 0
;CopyLocalProperties = 0
The property settings are inside the Cadit Update Drawing.ini
From File to Drawing (First view)
[CopyModelProperties]
Property1=Summary Information.Title
;ToProperty1=Title Line 1
;IgnoreIfBlank1=1
Property2=Summary Information.Subject
Property3=Design Tracking Properties.Description
Property4=Design Tracking Properties.Project
From drawing to File (First view)
[CopyDrawingProperties]
Property1=Title Line 2
;ToProperty1=Document Summary Information.Category
;IgnoreIfBlank1=1
Property2=Title Line 3
Inside one file
[CopyLocalProperties]
;Property1=Design Tracking Properties.Part Number
;ToProperty1=Drawing No
;IgnoreIfBlank1=1